This week, Ryan breaks out some raven/eagle conversion and plays with a new technique: negative space painting! Click the link for the steps, and some patriotism.

Model Plan
I picked up this unit of Hrafnmenn from a friend in exchange for cash considerations, as mine got stuck in "not enough wave shipping" limbo from Mierce. I had always intended to use these models as Great Eagles, so integrating them into a Herd list as an Eagle regiment made perfect sense. Before priming, I used greenstuff to make their beaks more hooked and eagle-like; the Mierce models are actually ravens. As usual, I primed in black.
These models will have eight color elements. The majority of the model will be black, but after researching bald eagles I found that their black actually goes two directions: the outmost feathers highlight into a grey color, while the remainder of their feathers go brown. I'll try to handle this by starting with the same base coat, and then splitting the layers out to cover two of those color elements. Red, White, and Blue will play important roles because of the American undertones I want the unit to have; the heads and tail feathers will also be white, because that's the color bald eagles are. The feet will be yellow, but I was surprised to learn that bald eagle talons are actually dark brown; they'll be painted with the brown elements of the feathers. The last two color elements will be nonmetallics: silver for the scramseax (dagger) blades, and golds for the hilts, bracelets, and torcs.
 |
| The unit, primed. |
Main Body: Brown and Grey
As mentioned earlier, the first layer on the body would be shared between the grey and brown layers. Because I wanted these to seem very dark, I decided to try a new technique: negative space painting. This technique uses one or two very dark layers, and then rapid progressions up to light highlights in very limited areas, making a glossy effect. The transitions between layers are almost non-existent, but because the highlights are so limited, the effect work. Mike Scaletti, in San Francisco, is fantastic with this style.
Brown/Grey Layer 1: 3 drops SS Camo Black Brown, 1 drop Black, 1 drop water
Base layer applied with a Winsor-Newton Series 7, size 1 brush
 |
 |
| Brown/Grey Layer 1 |
Brown\Grey Layer 2: 2 drops SS Camo Black Brown, 1 drop Medium Sea Grey, 1/2 drop Stormy Blue, 1 drop black, 1 drop water
The second layer was done with a Winsor-Newton Series 7, size 0. The blue is added in this layer because shadows are blue and purple, and it's a good way to darken a tint closer to black if you're not going to use a purple ink wash (which I was not going to do for this unit).
 |
|
|
| Brown/Grey Layer 2 |
Brown Layer 3: 1 drop SS Camo Black Brown, 3 drops Cobra Leather, 1 drop water
Painted with a Winsor-Newton Series 7, size 00. This layer starts showing the harshness of that transition, as I went from smooth transitions to very harsh contrast lines to hint at feather texture.
 |
|
|
| Brown Layer 3 - front of unit |
 |
|
|
| Brown layer 3 - rear of unit |
Brown Layer 4 - 2 drops Leather Brown, 2 Drops Elf Flesh, 1 drop water.
Again, very harsh transitions to make the brown seem almost black, and then a lot of edge highlighting (especially on the wings) to make that transition pop.
 |
|
|
 |
| Brown layer 4 |
|
|
|  |
| Brown layer 4 - detail shots |
Grey layer 3 - 1 drop black, 2 drops Medium Sea Grey, 1 drop water
For the first grey layer, I edge highlighted with a Winsor-Newton Series 7, size 00, focusing on the top and left/right tips of each feather.
 |
 |
|
| Grey Layer 3 |
Grey Layer 4 - 2 drops Medium Sea Grey, 1 drop Medium Grey
For the final layer on the grey, I used a Winsor-Newton Series 7, size 000, and did very nit-picky edge highlighting.
 |
|
| Ormrinn |
 |
 |
| Agni, with the brown and greys done |
 |
|
| Oddr |
White
White Layer 1 - 3 drops Medium Sea Grey, 1 drop water
For the white, I started a bit darker than I normally would, just to continue trending the model towards a darker tone. I went back to the Series 7 size 1 for this layer.
 |
|
 |
| White - Layer 1 |
Layer 2 - 1 drop medium sea grey, 1 drop Wolf Grey, 1/2 drop water
Simple layer work for the second layer, using a size 0 brush
 |
|
|
| White - Layer 2 |
White Layer 3 - 3 drops Wolf Grey, 1 drop water
Back to a 00 brush; when doing four layers, I typically drop a brush size for every layer.
 |
|
|
| White - Layer 3 |
White Layer 4 - 2 drops wolf grey, 1 drop skull white, 1 drop water
Finally, all the way back down to a 000.
 |
|
 |
| White - Layer 4 |
Yellow
Yellow Layer 1 - 1 drop Bestial Brown, 1 drop Gold Yellow, 1 drop water
Yellow is a tricky color for a lot of reasons. First, the pigmentation never seems opaque enough, so you tend to have to do several layers of one shade to get it to coat. Second, it mixes unpredictably with other colors. When I need a darker yellow, I tend to cut it with brown in order to get the tint consistent with what I need.
 |
|
 |
| Yellow layer 1 |
Yellow Layer 2 - 1 drop Bestial Brown, 3 drops Golden Yellow, 1 drop water
I think this layer was the point where I began to realize the color scheme for the model was going to be where I wanted. Unfortunately, I was so excited by my progress that I didn't take any pictures of the yellow layers after this point! We go now to the next color, already in progress
Yellow Layer 3 - 2 drops Golden Yellow, 1 drop Moon Yellow
Yellow Layer 4 - 2 drops Moon Yellow, 1 drop Skull White
Reds
Red Layer 1 - 3 drops Gory Red, 1 drop SS Camo Black Brown, 1 drop water
Just to be completely unsubtle about this unit, I decided to do the straps and loincloth in red, white, and blue. Fortunately I talked myself out of doing stars on the loincloth as well; that just would have been tacky.
Red Layer 2 - 3 drops Vallejo Red, 1 drop Vallejo Bloody Red, 1 drop water
 |
|
| Starting on the reds |
Red layer 3 - 2 Vallejo Bloody Red, 2 Hot Orange, 1 Water
Red Layer 4 - 2 Vallejo Hot Orange, 1 Vallejo Golden Yellow, 1 Water
Again, smaller surface area means more likelihood that I just keep painting instead of taking pictures. Such was the case with the reds.
 |
|
|
| Finished with the reds |
Blue
Blue Layer 1 - 3 drops Stormy Blue, 1 drop water
Blue Layer 2 - 2 drops Stormy Blue, 1 drop Ultramarine Blue, 1 drop water
Blue Layer 3 - Add 1 drop Glacier Blue to the above mixture
Blue Layer 4 - Add 2 drops Glacier Blue, 1 drop water to the above mixture
Blue Layer 5 -1 drop Ultramarine Blue, 3 drops Glacier Blue, 1 drop White, 2 drops water
I just rapid-fired the blue; start to finish was under an hour.
 |
 |
|
| Blues completed |
White Redux
Using the same layers as above, I finished the details on the model with white - every other armband, and stripes on the loincloth.
 |
|
|
| Red, White, and Blue completed |
Non-metallic gold
 |
 |
|
| Non-metallic gold knocked out |
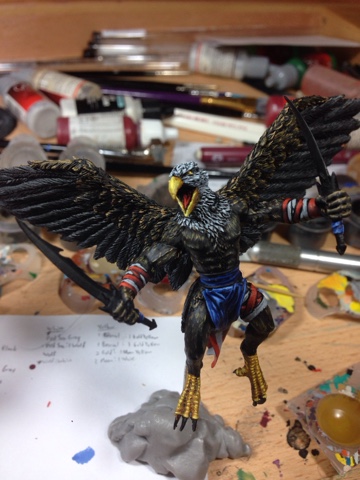
Finished unit
The unit will be multi-based when I start on the rest of the army's multi-basing, so I'm calling them done for now.
 |
 |
| Unit, from slightly above | The unit, from behind |
 |
 |
| Ormrinn |
 |
| Agni |
 |
|
| Oddr |


Great looking unit, cheers for the detailed step by step. I was eyeing this set during Mierce's recent sale but couldn't figure out a use for them ... but Great Eagles for KOW is a brilliant one!
ReplyDelete