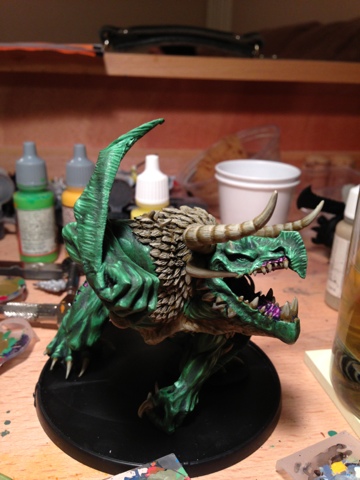
We go back into painting Glaun! Check out how we get from halfway through to the finish, after the jump...


Now that the skin and mouth are done, I base coated the rest of the model - scales, teeth, claws, and the underbelly. I'm painting all of them the same color, and I will then glaze the underbelly to give it a more green tint to bring it back into the skin tone.


Now that the skin and mouth are done, I base coated the rest of the model - scales, teeth, claws, and the underbelly. I'm painting all of them the same color, and I will then glaze the underbelly to give it a more green tint to bring it back into the skin tone.
The first layer is 4 parts Leather Brown to 4 parts SS Camo Black Brown to one part Goblin Green, which if you remember, was the midtone for his skin.
Though not obvious, using a touch of that goblin green will blend the two shades together and make them seem more natural next to each other.
SS Camo Black Brown is one of the utility colors I use very frequently. Any time I want to make something darker without using pure black, Camo Black Brown is what I use. It adds an earthy realism to darker colors, and allows me to shade several vastly different color schemes will still pointing them to similar points of the spectrum.
I let it sit overnight (unboxing the trolls took longer than i had expected), and came back to it the next day.
The second layer was 4 parts Cobra Leather to 2 parts SS Camo Black Brown, with 1 part goblin green for consistency.
The scales took longer than expected - there's a lot of detail there! You can see the brown already becoming brighter. We'll continue that trend...
The horns are being done the same way, but figuring out how to use the ridges effectively on the top set has been a challenge so far. Also, my IPA went empty and had to be replaced.
Layer 3:
Refilled with a Flemish Sour Ale and went back to work. This time the color mix was simple: 4 Cobra Leather to one Goblin Green.
You can start to see the highlights coming in. With the green additive I've been using, the scales look like they belong, instead of being completely apart from the skin tone.
I decided to shade the bottom horns as I normally would, but to allow the rings on the top set to break up the transition from light to dark. At this point, it's still too early to tell if it will work.
Layer 4:
The fourth layer showed 2 parts Cobra Leather to two parts Medium Grey and 1 part Goblin Green. I also switched from a Games & Gears 1, back to my Winsor Newtons.
The horns on top, however, are coming along better than I had expected.
[Day Five]
Layer Five is all Medium Gray, mixed just over 4:1 with Goblin Green. I've started pulling back the Goblin Green slightly, so that by layer eight it will be all gone.
Medium Gray is my second utility color - I use it in almost everything I paint. It allows me to grey out colors and dim their vibrancy without completely changing their hue.
It also has a great side effect of being very useful in bringing darker browns into a bone shade, and you can see that leather brown starting to look much brighter.
Layer six:
Now I've mixed Medium Grey 1:1 with Pale Flesh. Usually I use bone white for bone, but I usually use Beastial Brown for my bone, rather than Leather Brown. Bone white is very close to Medium Grey, while Pale Flesh is closer to yellow than grey. With the goblin green still being added in minute amounts, I went with the yellower shade to continue emphasizing those shades.
[Day Six]
Layer seven:
Layer seven is all Pale Flesh. I just barely touched the dropper of Goblin Green to my mixing tray, so there's a hint in there, but not an excessive amount.
The front from above and below. The chest is pretty much done with highlighting at this point - light reflected from the ground wouldn't highlight a model to my next highlight step.
Layer eight:


No comments:
Post a Comment