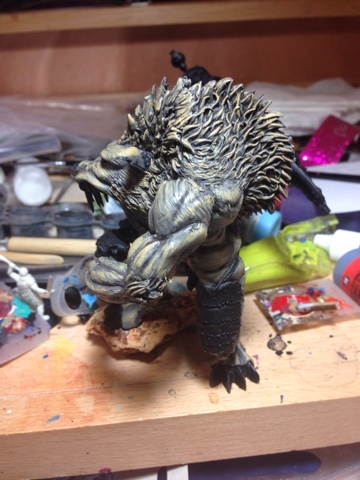
In this week's post, Ryan finally shows off how the Wolf-Vore sculpt ended up getting painted.

This is part two in the scratch-built project that was my first Mierce Miscast Mashup - a model created exclusively from parts in my miscast bags. You can click here if you want to read the step-by-step on how he was made.
The model was primed black, which is a cop-out I usually do to save me the effort of blacklining the model once the paint is done. Once that was done, I started with a 50/50 mix of SS Camo Black Brown and Medium Grey, with a tiny touch of royal purple. I like using purple as a shade with brown because of the high contrast it provides (a cool color compared to the warmer brown), as well as because it tricks the eye into thinking the shadows are more accurate - shadows tend to have a lot of bluish tint, but our eyes don't notice unless it's on snow [example].
 |
 |
 |
| First layer, left side | First layer, right side | First layer, rear |
This did two things - it subtly darkened the purple to increase the shadows, and it pulled the grey out of the previous layer into a warmer brown tone. There was a second reason behind this - when I painted the Rackham wolfen/devourers that would be come my Ogre Kingdoms army, I had a warmer brown base coat, and I was worried this model was going to stand out too much from a color tone.
 |
 |
| First wash, left side | First wash, right side |
 |
 |
 |
| Second layer, right side | Second layer, rear right | Second layer, rear right |
For the third layer, I went down to a single drop of SS Camo Black Brown, a drop of Medium Grey, and two drops of Brown Earth, which is a khaki-yellow brown color slightly darker than Snakebite Leather (on the GW color scale).Worried that it was going too dark, I then added a touch of Stonewall grey to give it a lighter, slightly chalkier complexion.
 |
 |
 |
| Third layer, left side | Third layer, right side | Third layer, left rear |
The fourth layer was a 3 drops of English Uniform to 3 drops of Bleached Bone (or bonewhite, to the GW paint users), with a dab of Stonewall Grey to retain that grey tint.
 |
 |
 |
| Fourth layer, left side | Fourth layer, right side | Fourth layer, right rear |
The fifth layer was 3 parts Bleached Bone to one part English Uniform, with a touch of white instead of Stonewall Grey, to get the visuals to really pop.
 |
 |
 |
| Fifth layer, left side | Fifth layer, right side | Fifth layer, rear |
For the warpstone in the cannon-club, I started with 50/50 Dark Angels green to SS Camo Black Brown, and quickly highlighted it up through Goblin Green and into Fluo Green, then swiped a quick white highlight across the edges to give it that gemstone reflectiveness. I also worked some blue into the cannon, just to give a contrast color.
 |
| Warpstone core |
 |
| Finished model, left side |
 |
| Finished model, front |
So what's up next for me? The Alamo is but a few weeks away, so I'm heavily into terrain creation/repair. I've been playing with spray paint and stencils, which was fun but probably not worth a blog post, and messing with some water effects, which I may post about if I have time. I've also got another order of miscast bags to share with you.
After that, I'll be participating in the Counter-Charge podcast's Army in a Weekend challenge, the weekend after the Alamo you can expect to see just a ton of picture dumps as I update progress. I probably won't have much in the way of commentary on those (at least not live), but I will try to retroactively add stuff or try to write stuff in advance if I already know the layers I'll be using. Expect a post in the next week or two previewing that. Spoiler alert: It'll be a dual use Darklands/Kings of War army, using Fomoraic models to make a Herd force!
No comments:
Post a Comment